

Torellian Invader (3" upscale)
This is another upscale of my Torellian Invader, this time built around a three inch fiberglass airframe. My goal is to have the rocket finished and ready to fly for LDRS 44 in April, 2026. It is expected to fly on an AeroTech K805 Mojave Green motor.
Build Progress
I am keeping a detailed build diary - I won't post the whole thing here, but this is an abridged version. The project has had some stops and starts, and I've changed my mind about some things as I went along.
June 17, 2025: Initial brainstorming. I was initially thinking about building the rocket a cluster with small (24mm or 29mm) motors in some or all of the tube fins, but I've decided that's a bad idea, at least for now.
July 11, 2025: Figuring out the tube fin attachment in detail. There will be two 3D-printed rings that slide over the airframe with cutouts to cradle the tube fins, and bolts from the inside of the tube fin into T-nuts inside the airframe.
July 13, 2025: Decided to 3D-print the entire nose cone rather than start with a fiberglass nose cone. Also settled on having a TeleGPS in the nose and a BlueRaven in the coupler. I was initially picturing an external power switch for the TeleGPS (so it could be powered off without pulling the sled out of the nose) but decided against that.
July 16, 2025: Added rail buttons to the design, inside one of the tube fins. This requires a small cheat - the original Torellian Invader had tube fins at 3 and 9 o'clock relative to the canopy, but in order to put the rail buttons opposite the canopy on this design, I need to have tube fins at 6 and 12 o'clock.
July 30-31, 2025: Made more progress on the CAD model and ordered most of the materials from Wildman and McMaster-Carr. I also bought a cutoff saw for cutting the tubes.
September 18, 2025: Coming back to this project after a break and planning next steps. Another part of the design that fell by the wayside is an external camera shroud. I wanted to have a camera on the same side as the canopy, looking back past the "pilot" (in this case, a Greedo action figure) and possibly dress up the shroud so it looked like a laser cannon or something. I finally decided that would add too much weight and drag on that side, so I gave up on that idea.
September 25-27, 2025: Came up with the idea of embedding a wing nut in the tip of the nose and printing over it, so the threaded rod can screw in.
October 9, 2025: Finished CAD on the nose cone while visiting family in Las Vegas.
November 28, 2025: Lost momentum on this project again. Ordered the motor and motor case on a Black Friday sale from BuyRocketMotors.com. Rearranging the task list to put some more fun stuff up front to maintain my enthusiasm. To that end, starting 3D printing prototypes and iterating on the nose cone design.
November 29, 2025: Ordered stickers from StickerShock.
December 1, 2025: Made the first big round of CAD fixes on the nose and getting close to having the flight-ready parts.
December 4, 2025: TeleGPS sled and upper nose printed; I'm still having some printability problems with the lower nose but getting closer, I hope.
December 5, 2025: Motor and motor hardware arrived. Still don't have a good print of the nose but I tried out the heat-set inserts and they work great.
December 9, 2025: Have a good print of the nose at 25% infill (to increase weight).
December 10, 2025: Reprinting the sled to correct a few minor issues, then the nose should be ready to assemble (and weigh). Finally set up the chop saw and cut all of the tubes (photo below). The tube fins will need to be sanded to even out their lengths.
December 11, 2025: It's taken several tries to get the sled to print properly. The last one is good, but the outer bracket broke as I was pulling it off the print bed. Also, between last night and today I think I have a first pass at designing all of the drilling and fin jigs.
December 18, 2025: Sanded off the ends of the tube fins to make their lengths even; final length is 247 mm. Weighed the parts I have and updated the sim file:
- Tube fins: 93g each
- Lower airframe: 1 lb. 3.5 oz. (yes, I know I'm mixing units, I have three different scales)
- Upper airframe: 15.3 oz.
- Nose with all hardware: 1 lb. 7.5 oz.
January 2, 2026: Back at it now that the holidays are done. I decided against buying a bandsaw to cut the fins; I have ordered some fiberglass cutting blades for my jigsaw and will try that. Printed the tube fin jig and the fin templates. Wrote detailed assembly steps to sort out what has to happen before painting; I'm aiming to do the painting in late February while Colleen is out of town.
January 3, 2026: I had a thought about transportation and storage: I want to get a big storage bin big enough to hold all the sections of the rocket and line it with egg crate foam and/or quilts. I can use this to transport the rocket to LDRS as well as for storage between launches.
January 7, 2026: Made some attempts to cut fins out of the fiberglass stock, none of which worked well:
- Jigsaw with the new blade worked OK but is not precise, which means a lot of sanding to get the fin shapes right
- Sanding on the little belt sander I have works, eventually, but will be extremely time consuming
- Tried cutting fiberglass on the scroll saw and immediately wore the teeth off the blade; google didn't immediately turn up any blades suitable for fiberglass that will work with this saw
Based on that, I've decided to try just printing the fins in PETG. JB Weld may work adequately for bonding PETG to fiberglass - I'm printing a couple of test fins and will try them on the leftover tube scraps. I put a slot parallel and a couple mm above the root edge for epoxy to flow through and hopefully add mechanical strength.
January 9, 2026: I have the second fillet curing on the first test fin now (tacking the fin with JB Weld and then filleting with more JB Weld). I don't love JB Weld for the fillets. I am planning to test the second fin using JB Weld to tack on but thinner epoxy (maybe 30 minute BSI) for the fillets. I will need to tape wax paper over the back side of the fin slot when pouring the first fillet.
Immediate TODOs:
- Assemble the nose and update the sim with its actual weight
- Print drilling / fin jigs
- Even out the tube fin lengths
- Weigh the tubes and update the sim with those weights
- Drill all the holes
- Print tail rings and start dry fitting the tail parts
-
 OpenRocket design
 -
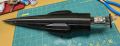
 CAD of nose cone (3D printed in three pieces)
 -
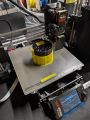 Lower part of nose being printed (yellow material is support and will be removed)
 -
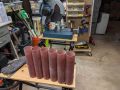 Tube fins cut with new chop saw
 -
 Nose cone with TeleGPS sled
 -
 The Estes catalog page for the Starfighter Combo Kit


Launches
Checklist
Pre-launch (before leaving town):
- TBD
Pre-launch (night before launch):
- TBD
At the field:
- TBD
At the pad:
- TBD
Recovery:
- TBD